- Home
- Compare Systems
- Cheap Systems
- Free Quotes
- DIY Systems
- Hardwired Systems
- Wireless Systems
- Smoke Detectors
- Medical Alarms
- Alarm Monitoring
- Cameras & Video
- Ademco
- ADT Security
- Brinks Security
- Broadview
- DSC Security
- FBI Alarms
- GE Security
- Honeywell
- Link Interactive
- Monitronics
- Moose
- Napco
- Protection 1
- Radionics
- Simplisafe
- Alarm Manuals
- Alarm System Parts
- Alarm Tools
- Troubleshooting
- FAQ
- Glossary
- Sitemap
- About Me
- Contact Me
Using a Tone and Probe Kit
for Finding Cut Alarm Wires
A tone and probe kit is used to trace wires or cables by sending a signal from one end of a wire along its entire length. This is usually done to trace the location of a cut or missing door, window, or other alarm wire. A tone and probe set can also be used to identify unlabelled wires that run to remote locations from a central alarm panel.
A tone and probe kit includes two parts:
- The first is an audio-frequency tone generator, which is connected to one end of a cable to inject a signal.
- The second part is the inductive amplifier probe, which detects the signal anywhere along the length of the wire and emits it as an audible tone.
The tone generator unit has alligator-type clip-on test leads. These are connected to the bare copper ends of a pair of wires at one end of the cable that needs to be located. The probe, sometimes referred to as a “rocket”, picks up the signal wirelessly through induction. The signal is then amplified to create an audible tone that sounds through a speaker built into the probe.
I started
out using a tone generator and probe with a classic tone and probe kit
from Progressive Electronics, based in Mesa, Arizona. They are still
making tone and probe tools under the “Tempo” brand name, and I now see
them distributed by Greenlee. I’ve since used various other brands of
tone generator/probe tools, including some by Fluke, Klein, and
Cen-Tech.
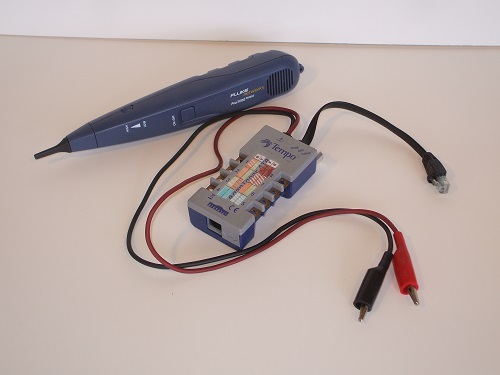 Tone generator with probe. Even though toner is Tempo brand, and probe is by Fluke, they work just fine together.
Keep
in mind that toners and probes are fairly generic, and can be mixed and
matched between brands. All tone generator tools create an audio
frequency signal, just like the left or right speaker outputs of a
stereo amplifier. Likewise, the amplifier probe picks up these audio
frequency signals, and “plays” them through the built-in speaker.
This
is good to know if one part of your tone and probe kit fails. You can
borrow a toner or probe from another kit, and get back in action until
you have time to fix or replace the failed part.
Tech Tip:
If your tone generator fails, but the probe still works, you can unleash your “inner MacGyver” and make your own tone generator.
Just scrounge up a scrap pair of earbuds or headphones, and cut off the earpieces. Strip out one of the earbud wires (one without any volume controls, if you please) and separate the center conductor and the shield. Then, connect them to the wire under test.
Insert the plug into the earphone jack of your iPhone, iPod, a transistor radio, or other audio source. Now, play a song or tune in some music on the device.This will inject an audio signal into the wire, just as a tone generator does. The signal can then be picked up by any standard amplifier probe.
For this to be most effective, turn the volume adjustments on your source and your toner probe all the way up. You can increase the signal even more by connecting one wire to a signal ground, discussed further down this page.
This isn’t something you’re likely to do often, but it gives you a backup option if your regular tone generator goes down for some reason.
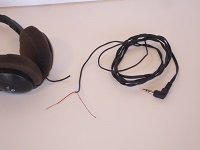 Scrap headphone cord, with one wire stripped out
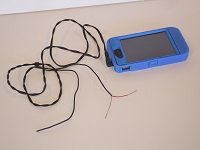 Cord plugged into iPhone as a “MacGyver” tone generator
Using a Tone and Probe Kit
All tone generators that I’ve ever seen also include a continuity test function. This is a necessary feature, because
sending a tone down a pair of shorted wires will kill the tone,
so much so that the probe won’t be able to pick it up.
The
continuity test has another function: It’s a quick way to check the tone
generator’s battery. Before the first use of the day, flip the toner to
“continuity”, and touch the test leads together. If you don’t get a
light, or it’s very dim, replace the toner battery. If the light is nice
and bright, you’re ready to go.
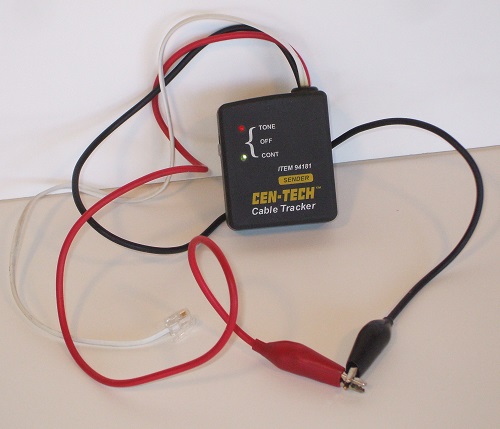 Testing the tone generator battery using the continuity tester
To
begin toning out a wire, connect each tone generator lead to a
different conductor of the “target” wire to be toned out. Briefly switch
the generator to the “Continuity” function, to make sure there is no
short (light stays off), then proceed with toning. If the light is lit,
there is a complete or partial short circuit on that pair of wires. (See
the section on ”Shorted Wires” below.)
After verifying that
there is no short, switch to “Tone” mode, and move to the area you
suspect the wire is located. Activate the probe, and move it across the
wall or other surface nearest to the wire.
If the target wire is in the area, you should be able to hear the tone. Keep moving
the probe around until you find the path or spot with the loudest tone. That is the location of the wire.
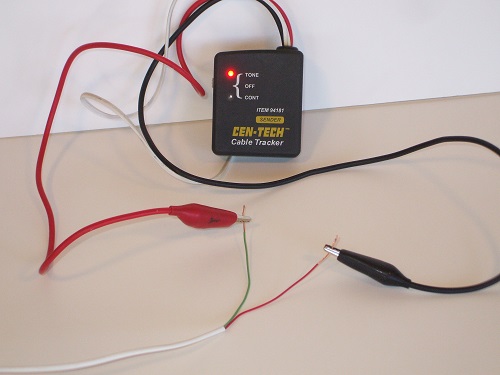 Tone generator connected to target wire
In
alarm work, you’re most likely using a tone and probe kit to locate a
cut or buried wire. In that case, you now know where to cut a small hole
in the drywall and fish the end(s) out. If both ends of the target wire
run are accessible, you can tone first from one end, then from the
other. This will allow you to zero-in on both of the damaged ends and
pull them out.
You may have to make two holes in order to fish
out both ends of the wire, since there might not be enough slack to pull
them out of the wall enough to make connections. If that’s the case,
you’ll also need a short piece of the same kind of wire to allow enough
length to make up the splices.
Boosting Tone Generator Volume with a Signal Ground
Sometimes when using a tone and probe kit, you’ll find that the tone is faint and difficult to pick up. In that case, adding a signal ground can help.
A signal ground is just a point of reference with respect to the other end of the tone generator. This need not be an actual electrical ground, although it can be. We’re just looking for anything metallic and separate from the wire we're testing.
This can be an electrical outlet box or screw, metallic
conduit, or a metal window frame. You can even use yourself as a
signal ground, by holding onto the bare metal of one alligator clip
lead. In fact, the capacitance of your body works quite well as a signal ground.
Here's how to do it:
- Connect one lead of the tone generator to one leg of the wire, as usual.
- Connect the other lead to a signal ground.
A variation on this is to connect both wires to the toner leads, just as you normally would, but arrange it so that one of the leads also touches a signal ground. This will sometimes give a slightly less boost to the signal, but with less bleed onto surrounding wiring.
What is bleed, you ask?
Read on...
Problems While Using a Tone Generator and Probe
Bleed Onto Nearby Conductors
The tone you inject onto a particular wire can sometimes bleed over
onto neighboring conductors and wires, causing confusion as to the
actual path. This happens most often when the wire under test runs close
to other wires along a common pathway through a soffit or other wiring
chaseway.
You may pick up this signal bleed after the wires
have diverged from the common path, giving you a false indication of
where your wire runs.
Bleed
is almost never as strong as the signal emitted by the wire under test,
but if the bled-on wire is closer than the test wire, its signal can
overpower it.
With experience using a tone and probe kit,
you’ll learn when to recognize when bleed is occurring, and under which
conditions you might expect it to happen. It isn’t usually a big
problem, but some things you can do to reduce the effects of bleed are:
- Don’t connect to only one conductor of a wire you’re trying to trace (unless you have a shorted 2-conductor, as described below). This increases bleed immensely.
- Unless you’re deliberately trying to use a signal ground to boost the tone, make sure neither lead of the tone generator touches any surrounding metal objects. This includes mud rings, window or door frames, electrical outlets, ground wires, alarm panel boxes, etc. Likewise, don’t touch either alligator clip of the tone generator with your hands when trying to locate a wire.
If
you think you’ve found the target wire, but suspect bleed is
occurring, make a small (dime-sized) hole in the drywall and fish out
the wire. If you turn out to have the wrong wire, a small hole is easier
to patch and won’t be as noticeable.
Tech Tip:
By the way, signal bleed is the main reason I’m not a fan of using a tone and probe kit for ID’ing and labeling wires. Instead, I much prefer an audible continuity tester.
In a smaller house (under 3,000 square feet or so) the tone and probe will usually work fine.
In larger houses, many alarm wires often share a common chaseway for long distances as they cross the house, especially over vaulted ceilings and other constricted areas with limited pathways.
This long distance causes a tone on any single wire to induce bleed onto all of the nearby alarm wires. If you try to “ring out” wires using a toner, you’ll tend to get many false hits on each wire before you isolate the correct one.
Shorted Conductors
If you run into a situation where you need to tone out a shorted
wire, try to switch to a pair of wires in the same cable that isn’t shorted.
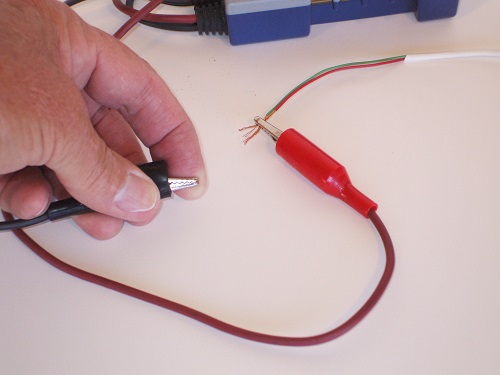 Using a signal ground on one lead to allow toning on a shorted wire
If
you’re trying to tone on a 2-conductor wire, there are no other
wires to switch to. In that case, it’s time to violate the warnings I
just gave above:
- Connect one lead of your tone generator to one (or both) of the conductors to be tested.
- Connect the other tone generator lead to a signal ground
This
will greatly increase the tone, and give you a better chance of finding
the wire under test. Of course, the drawback is that it will probably
also cause lots of bleed onto other nearby metal or wiring.
Using
a tone and probe kit is not an exact science. You’ll have to strike a
balance between creating enough signal to find your target wire, while
at the same time figuring out which signals are just useless bleed.
Twisted Pairs and Noise Cancellation
Also important to know is the fact that twisted pairs found
in many kinds of wire tend to reduce or cancel out the tone. Cat-5,
Cat-6, and many multi-pair cables contain several sets of twisted pairs.
There is a good reason for this: the very purpose for twisting the pairs in the first place is to cancel noise. The signal from our tone generator is technically noise, so for our purposes, cancelling it out isn’t desirable.
So, what can we do?
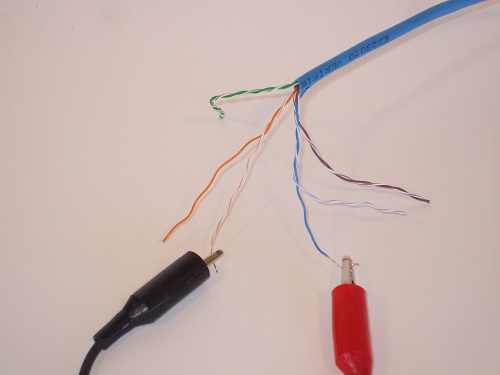 Toning on off-color wires to avoid signal cancellation in Cat-5 and other twisted wires
The
solution: When toning out a cable with multiple twisted pairs, connect
the tone generator leads to off-colored wires. So, for example,
instead of connecting to the toner leads to the blue and blue/white pair
of wires, connect to the blue and orange wires.
Even though the pairs are also twisted around each other, the rate of
that twist is very gradual, and won’t kill the tone like the
much tighter twist rate of the like-colored wires.
A
premium tone and probe kit like the Fluke Pro3000 Tone and Probe set
have some additional features that can make your work easier.
Among these are:
- Multiple tones to better identify individual wire pairs
- RJ-11 telephone and/or RJ-45 data connectors
- Bed-of-nails clips to make connecting to insulated wires easier
So, who should own a tone and probe kit?
If you’re in the alarm business, a a good quality tone generator with probe is a must-have. Trying to trace a cut wire without a tone and probe kit is a frustrating waste of time. It's also totally needless, considering most of these kits cost around $100.
You’ll Probably save the cost of the tool in labor alone on your first cut-wire repair job.
If you’re a DIYer
or home hobbyist, you may never have a need for one of these tone and probe sets.
If
you ever do, but don't want to spend too much money, I recommend the
budget-priced Cable Tracker tone and probe kit from Harbor Freight
Tools.
It’s not a premium tone and probe set, so it’s not built as ruggedly as the Fluke and similar kits. But, it performs the basics well enough, and costs less than $30.
Not sure you have the skills needed to install an alarm system yourself?
Or, do you have plenty of skills, but not enough time?
I understand completely. These are two of the reasons I’ve partnered with BuyerZone. Using their connections with alarm dealers across the country, you can quickly get free alarm quotes from companies in your area.
Just answer a few easy questions below, and you’ll receive your free price quotes shortly.
Try it now!
Related Articles:
Wire Stripper Tools, Cutters, and Crimpers
The All in One Screwdriver and Other Useful Screwdrivers
The Digital Multimeter as an Alarm Installation Tool
Using a Continuity Tester for Alarm Installation and Service
MagLite LED Flashlight and Other Small Flashlights
Electrician Tool Pouch And Other Tool Bags and Buckets
Return to Alarm Installation Tools from Tone and Probe Kit
Return to Home Security Systems Answers from Tone and Probe Kit
Note: Feel free to print any of the articles on this site for personal, non-commercial use. Just look for this button:
If you found this website especially helpful, you might want to consider making a small donation. Since 2011, AzAlarmGuy has been providing free help and advice on home security systems to all of those in need.
Your gift, in any amount, will help me keep this website a free resource for anyone needing help with alarm system issues or questions.
Disclosure
I receive affiliate commissions from some of the companies and products I discuss. These commissions don't change the price that you pay.
Rest assured that this compensation does not influence my recommendations. I only endorse products and services that I truly believe to be an honest value for you, as a visitor to my site.
For more details, see my full disclaimer.


