- Home
- Compare Systems
- Cheap Systems
- Free Quotes
- DIY Systems
- Hardwired Systems
- Wireless Systems
- Smoke Detectors
- Medical Alarms
- Alarm Monitoring
- Cameras & Video
- Ademco
- ADT Security
- Brinks Security
- Broadview
- DSC Security
- FBI Alarms
- GE Security
- Honeywell
- Link Interactive
- Monitronics
- Moose
- Napco
- Protection 1
- Radionics
- Simplisafe
- Alarm Manuals
- Alarm System Parts
- Alarm Tools
- Troubleshooting
- FAQ
- Glossary
- Sitemap
- About Me
- Contact Me
Burglar Alarm System Troubleshooting
Solving Problems with Open Magnetic Contacts
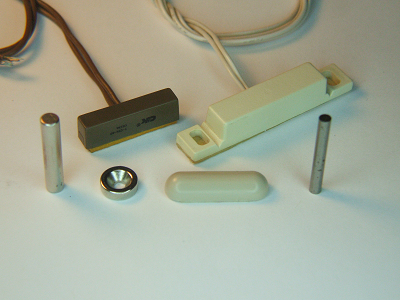
Of all the problems that require burglar alarm system troubleshooting, a simple open zone is the most common. This usually affects perimeter alarm zones, which are the exterior doors and windows that lead into the house.
This page deals with a typical open zone problem, a door or window that is displaying on the system keypads as faulted all of the time, and prevents normal arming of the system.
If you’re having trouble with an “open” condition that is intermittent
and only happens once in a while, check out "How to Troubleshoot Alarm Panel Wiring - Finding and Fixing Intermittently Bad or Falsing Zones."
If you need help with a door or window switch that doesn't show up on the keypad or trip the alarm when open, see "Alarm Switch Troubleshooting - Finding and Fixing Lightning Damaged Alarm Contacts".
Is your alarm system operating erratically? You may need a new alarm system battery.
Troubleshooting requires many of the same tools needed for alarm installation. Make sure you have what you need before you begin.
If you're into DIY alarm systems, you may want to follow all of the steps below to solve an open-zone problem. It can get a bit tedious, but if you're willing to give it a shot, I'll be here to help you.
If you don’t want to get involved with detailed switch troubleshooting, I urge you to at least try the "simplest alarm troubleshooting" step below. It’s so quick and easy that anyone can do it, it requires no tools, and it might just save you money and headaches down the line.
Common Causes of a Faulted Zone
Window or Door Simply not Fully Closed
This happens more often than you might think, mostly with sliding windows. Even with no damage or wear, if the window isn’t closed all the way, the magnet may not line up with the switch.
Missing Magnets
The sticky tape used to attach magnets and contacts can dry out, allowing them to come loose. They can also rub or strike other parts of the door or window and be knocked loose.
Misaligned Magnet or Switch
Over time, doors can sag and warp, moving the magnet out of alignment with the switch. Windows can get looser in their frames, and fail to close to the same point they did when they were new.
Misalignment can reduce the force of the magnet on the switch, preventing it from closing properly. Alignment problems can also cause too big a gap between the switch and magnet, also preventing a closed circuit.
Damaged Switch or Wires
Switches and alarm wiring can be damaged by the magnet or the movable portion of the opening. Doors can sag, rubbing on the frame and the switch. Windows that loosen up in their frames can allow enough movement to hit the switch and break it.
If you find an obviously damaged switch or wiring, replacing it will usually solve your open zone problem.
First, Try the Simplest Burglar Alarm System Troubleshooting Step Ever:
My first advice to anyone who has an open zone situation is
to go to every movable door and window on the affected zone. Open, then firmly close the movable.
Do NOT ignore or skip windows that "you never open" - These are very often the very openings that cause an open-zone situation.
Do NOT simply try to push the window or door further closed, since
doing so usually doesn’t work. Open it several inches, then firmly close
it.
Then, recheck the keypad. Many times, the zone will now be closed.
I’ve instructed many alarm customers over the phone to use this simple
troubleshooting step, and often saved them a service call charge.
Assuming that you have double-checked every opening on the faulted zone, let’s move on to the steps needed to fix a real problem.
Advanced Steps for Troubleshooting an Open Alarm Zone
If you happen to have more than one open zone, do yourself a favor and focus on only one zone at a time. Burglar alarm system troubleshooting is confusing enough with just one zone, let alone several. Troubleshoot one zone to completion before working on another one.
Ready to start?
OK, let’s go!
Begin by opening all of the doors and windows on the problem zone.
Next, tape a loose magnet right next to each switch. The easiest magnets to work with are the type designed for use with alarm switches, which are available through a link here and at the bottom of this page. In a pinch, any bar-type magnet with the “north” and “south” poles on opposite ends will work.
(For the photos on this page, I used bare magnets that show up well compared to the typical white-cased magnets.)
- For surface-mount switches, tape the magnet parallel and touching the switch. If the magnet isn't the same length as the switch, just center it left to right.
- For recessed contacts, arrange the magnet so one end meets the end of the switch. (It's OK for them to be at a right angle to each other.)
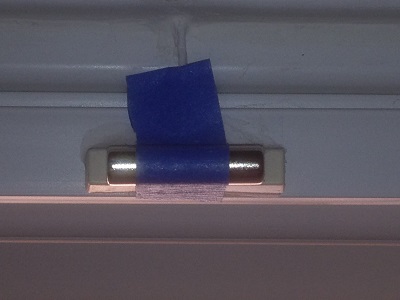
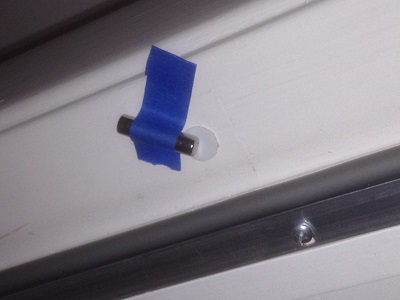
If doing this causes the zone to set up, the trouble is likely just a misaligned magnet. To find out which one it is, remove the taped-on magnet from one opening and close it. Check the keypad; if the zone is still closed, that switch and magnet are setting up OK. If the zone doesn't set up, that switch/magnet pair needs attention. Double check the gap and alignment and adjust if necessary.
Continue doing this with each switch on the zone until you've fixed any problem switches, and your zone will be fixed.
If taping on magnets doesn't cause the zone to set up, you may have a bad switch. Read on to see how to handle this problem, based on the layout of your system.
Burglar Alarm System Troubleshooting for a Bad Switch
Troubleshooting an Open Zone with a Single Alarm Contact
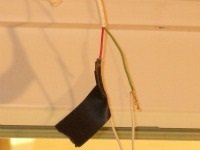
If there is only one switch on the problem zone, pull out the wiring at the switch. Remove any connectors or electrical tape covering the splice between the alarm wire and the switch leads, exposing bare wires. Twist the alarm wires together, shorting them. If the zone sets up, the switch is bad. Replace the switch, and the problem is solved. If the zone doesn’t set up, skip to the bad wire section.
Troubleshooting an Open Zone with Multiple Alarm Contacts
If there is more than one switch, check the alarm panel wiring in the main box. For the problem zone, see if you have multiple wire runs on the zone terminals or a single wire.
Multiple Switches with One Wire
If the problem zone only has one wire but multiple switches, then they are looped. The fastest solution is to pull switches one at a time, and short the wires together until the zone sets up. The switch wire that causes the zone to set up is the bad switch; replace it.
In rare cases, you may have a damaged wire run from the panel to the switches. In this case, pulling all the switches and shorting out the wires will not cause the zone to set up. If you run into this situation, skip to the damaged wire section.
Not sure you have the skills needed to install an alarm system yourself?
Or, do you have plenty of skills, but not enough time?
I understand completely. These are two of the reasons I’ve partnered with BuyerZone. Using their connections with alarm dealers across the country, you can quickly get free alarm quotes from companies in your area.
Just answer a few easy questions below, and you’ll receive your free price quotes shortly.
Try it now!
There is no obligation to buy, and no credit card information is requested.
Multiple Switches and Multiple Wires
Having several wires on the zone will allow you to meter each one, weeding out the good switch wires until you find the bad one.
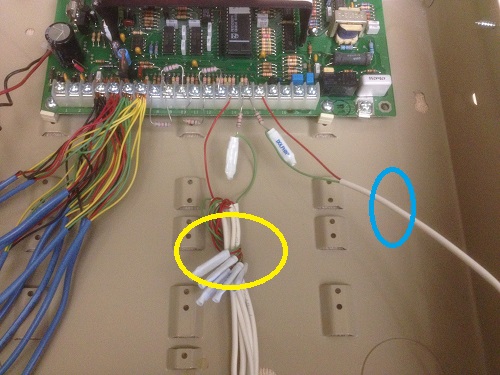
The example zone on the left below, circled in yellow, has multiple wires. The zone to its right has just a single wire run. (The other zones are "strapped out" with end-of-line resistors for clarity.)
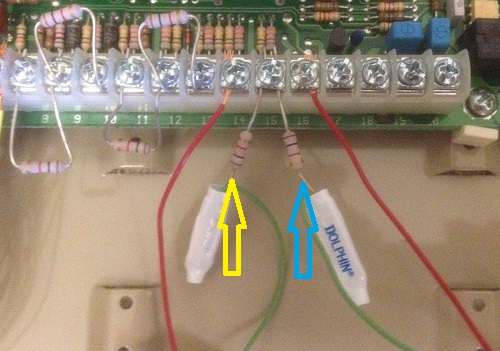
In the close-up below, Zone 5 wires are on terminals 14 & 15. Zone 6 wires are on terminals 15 & 16. Terminal 15 is a "common negative" for both zones. This arrangement of paired zones is typical of most alarm panel designs.
The arrows point to the EOLR for each zone (more on this in the next section.)
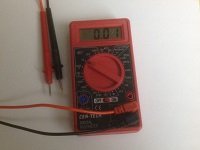
Burglar alarm system troubleshooting is best done with a DMM, or Digital Multimeter. These come in many price ranges with a variety of features. Luckily for those of us on a budget, an expensive meter isn’t needed for alarm work.
Virtually all DMM’s and analog meters can measure resistance, so most any meter you find will work for troubleshooting alarm zones.
The Extech MN35 Digital Mini Multi Meter available at Amazon.com is a good choice, and has several other functions like AC/DC volts and a diode check.
Harbor
Freight offers a basic DMM that normally costs about 10 or 15 bucks. Wait for
it to go on sale though, and it’s free with a coupon from the newspaper
or via email.
Dealing with End-of-Line Resistors (EOLR’s)
Before testing the problem zone, we need to do a quick check
to find out if end-of-line resistors (EOLR's) were installed on each
zone. EOLR's are used on some panels for zone supervision, which I won't get into here. Suffice to say that if EOLR's are used, they can be located "in the box" ("ITB"), or in the field,
meaning at the switch.
As shown in the photos above, EOLR's in the panel box are easy to
spot, since they're spliced in series with the zone wires.
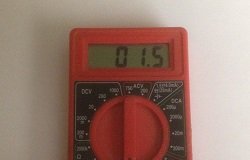
For an EOLR in the box, you'll just connect your meter so as to bypass it when testing the bad zone.
To find out if there are EOLR's in the field wiring, we need to know the value of the EOLR for this panel. This information is usually printed on a decal inside the lid of the panel box. In the photo below, we see that the EOLR for the zones on this Ademco Vista 10SE panel are 1K Ohm, or 1,000 Ohms.
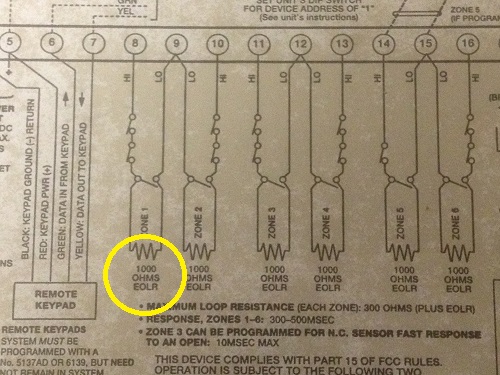
Once you know the EOLR value, remove the wires from a good zone, not the problem zone. Set the meter to read resistance, then connect the probes of your DMM or analog meter to the outer ends of the loop wiring.
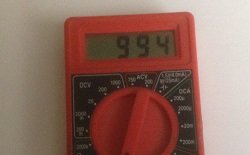
- If the zone reads from a few Ohms up to about 20 or so Ohms, there is no EOLR.
- If the meter reads the EOLR value (in this case, 1,000 Ohms) give or take 20%, an EOLR is installed at a switch on that zone.
After
determining whether or not there is an EOLR, replace the wires from the
“good” zone back on their original screw terminals.
Find replacement end-of-line resistors here.
Switch Troubleshooting by Metering Wires
Now we can start metering wires on the bad zone. Note that if an EOLR is
in the field, the resistance of the switch is now added to the value of
the end-of-line resistor, so you'll need to consider that when taking a
reading.
To begin metering, remove the wires of the problem
zone from the alarm panel terminals. If an EOLR is located inside the
panel, be sure to meter only the wires, not including the resistor.
If the wires are spliced and taped, remove the tape to expose each joint.
Connect
the leads of a digital multimeter (DMM) or analog meter to the first
wire in the series. If the splices were soldered and taped, you can just
hold a lead against each wire junction; if crimp connectors
(“B-connectors”) were used, the point of the meter probe will fit into
the end of the connector where the wires enter.
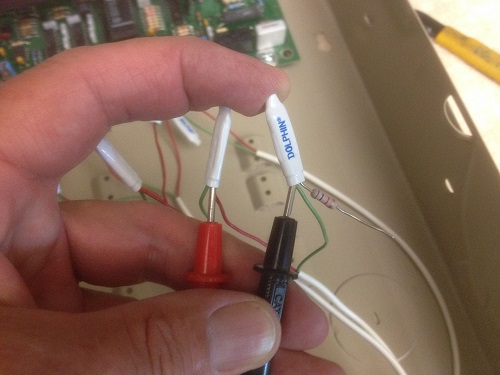
Notice in the photo above that the EOLR is not being measured, only the wires.
Meter
each wire one at a time. A good switch will measure just a few Ohms. A
bad switch can measure from tens or hundreds of Ohms up to an open loop
(“OL”) or infinite resistance.
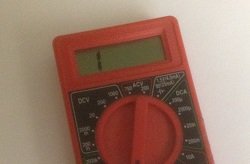
When you’ve identified an open loop, mark it with a Sharpie, or put a piece of electrical or masking tape on it.
Test the remaining wires, just to be sure you don’t have more than one “open” wire.
Removing Open Wires
Remove any open wires from the bundle. Using a pair of wire strippers,
cut the offending wire loose, and strip the insulation from the end(s)
of the good wires.
Splice the remaining zone wires back
together temporarily, and re-connect the bundle to the panel terminals.
The zone should now set up.
In the photo below, the circle shows the temporary splice where the bad wire was removed.
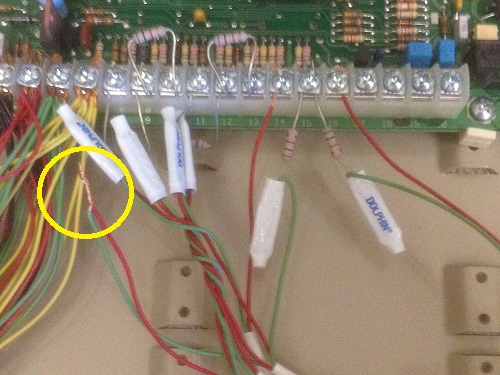
Now, remove the taped-on magnets one by one, listening to or checking
the keypad that each magnet removal causes the zone to chime or show
faulted on the keypad. Any switch that fails to display or chime when
the magnet is removed must be the wire you found to be open took out of
the bundle. Make a note of which door or window it is.
For any switches that DO display or chime properly with the magnet removed, close the opening and make sure the zone sets up. If any don’t, fix any alignment problems as described above.
When you’re done removing magnets and closing windows and doors, your zone should set up. You’ll also have made a note of one switch that didn't do anything. That is the problem switch.
Add this wire back into the zone. Then, pull out the wiring connections at the switch, and twist the conductors together to short the loop. If the zone sets up, the switch is bad. Replace it, and you’re good to go.
Once the zone sets up, re-tape or re-crimp the wiring you exposed. Crimp connectors are meant to be secured with a crimping tool, but a regular pair of pliers will do in a pinch.
If twisting/shorting the wires on the problem switch doesn't cause the zone to set up, the wire between the alarm panel and that switch has likely been damaged.
This can occur when service workers moving through an attic or a crawlspace accidentally cut or pull loose wiring. Rodents will chew almost anything, including alarm wires, and have caused me the occasional problem.
Burglar Alarm System Troubleshooting Options for Damaged Wiring
If you suspect damaged security alarm wiring, you have a couple of choices:
If your troubleshooting went smoothly and you're fairly certain you have a bad wire, you can run a new one yourself. This isn't for everyone. Most people will draw the line at alarm wiring, and leave this work to the pros.
On the flip side, maybe you had difficulties while troubleshooting, and aren't really sure if there is a bad wire or not. In that case, you may want to consider consulting an alarm company for help.
Whether or not you’re willing to run new alarm system wiring yourself, the alarm tech can at least verify your conclusions. Troubleshooting can be complicated, and a fresh set of eyes may spot something you’ve overlooked.
If the technician confirms that a new wire needs to be run, he or she can offer suggestions on the best way to get it done. If the technician finds an easier solution, you will have avoided the trouble of running a new wire without solving the problem.
Product Sources:
Alarm Contacts and Magnets
B-Connectors (Crimp-type connectors)
Extech Digital Multimeter (DMM)
Switches-Surface Mount
Switches-Recessed
Related Articles:
How to Troubleshoot Alarm Panel Wiring - Finding and Fixing Intermittently Bad or Falsing Zones
Alarm Switch Troubleshooting - Finding and Fixing Lightning Damaged Alarm Contacts
Removing Magnetic Door and Window Switches
Installing Surface Mount Switches
Return to Home Security Systems Answers from Burglar Alarm System Troubleshooting
Note: Feel free to print any of the articles on this site for personal, non-commercial use. Just look for this button:
If you found this website especially helpful, you might want to consider making a small donation. Since 2011, AzAlarmGuy has been providing free help and advice on home security systems to all of those in need.
Your gift, in any amount, will help me keep this website a free resource for anyone needing help with alarm system issues or questions.
Disclosure
I receive affiliate commissions from some of the companies and products I discuss. These commissions don't change the price that you pay.
Rest assured that this compensation does not influence my recommendations. I only endorse products and services that I truly believe to be an honest value for you, as a visitor to my site.
For more details, see my full disclaimer.


