- Home
- Compare Systems
- Cheap Systems
- Free Quotes
- DIY Systems
- Hardwired Systems
- Wireless Systems
- Smoke Detectors
- Medical Alarms
- Alarm Monitoring
- Cameras & Video
- Ademco
- ADT Security
- Brinks Security
- Broadview
- DSC Security
- FBI Alarms
- GE Security
- Honeywell
- Link Interactive
- Monitronics
- Moose
- Napco
- Protection 1
- Radionics
- Simplisafe
- Alarm Manuals
- Alarm System Parts
- Alarm Tools
- Troubleshooting
- FAQ
- Glossary
- Sitemap
- About Me
- Contact Me
Radionics Home Security
Keypad Commands for Newer Systems
For many years, Radionics home security systems used a set of standard “Commands” to perform arming, disarming, and many other functions of the system. Sometime in the 1990’s, Radionics Inc. strayed from this convention, and designed panels using a new set of numbered commands.

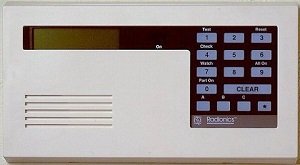
This page provides help with newer Radionics home security systems, like the D2212 and other D2000-series panels using D223 or 222A keypads. These keypads have a “Clear” button, but no “Command” key.
Note: The steps listed on this page will only work with newer Radionics Systems.
If you have an older-version Radionics alarm system, your keypads will have a dedicated “Command” bar or “CMD” button.
These systems included the D6112, D8112, D7212, and others, using keypads like the D620 and D1252.
For help using these systems, see my page on Radionics Security System Keypad Commands for Older Systems
Your particular system may not follow all of these functions exactly as described, since most panels have undergone several revisions. I recommend you get a copy of the User Manual for both your keypad, as well as for your main control panel. Between these manuals, you’ll have all the details on how to use each specific function.
For help finding a Radionics manual, see my page on Radionics Alarm Manual Sources.
Keypad Commands for Newer Radionics Alarm Systems
Press 1 - Perform System Test
Requires Owner Code to authorize. Pressing 1, followed by an
Owner Code, tests the bell, battery, and telephone line, in that order.
The testing can take up to 15 minutes total for all three tests. At the
conclusion of each test, the results are displayed as either “Passed” or
“Failed”.
Press 2 - Enter Remote Programming Mode
This function is used to allow the system to accept programming
changes from an alarm technician in another location, via its telephone
line connection. You’ll only use this when instructed to do so by your
alarm company.
Press 3 - Reset Sensors
Radionics home security systems use this function to reset smoke
detectors after they have been triggered. To use the function, press
“3”, followed by your Owner Code. The keypad will display “Resetting…”
for up to 20 seconds. This resets the system, and momentarily removes
power to connected smoke detectors (or glassbreak detectors, if
present.)
Press 4 - View Alarm Memory
After pressing the 4 key, press and hold the 6 key. The
system will display the point or points that caused the last alarm.
After all points have been displayed, the system will prompt you to
clear the alarm memory by tuning the system on.
Press 5 - Change Passcodes
This feature allows a user to change their own User-type passcode, and doesn’t require an Owner-type code.
- Make sure the system is disarmed/off.
- Press the 5 key. The OK tone sounds and the display prompts you to “Enter Old Code”.
- Enter your current passcode.
- Display prompts you to “Enter New Code”.
- Enter a new code (must have same number of digits as old code.)
- Display will prompt: “Enter New Again”.
- Re-enter the new code.
- Display will show “Code Changed”.
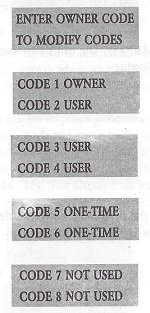
Press 6 - Show Users
Pressing “6”, by itself, will display a list of the codes in
the system by user number, followed by the code-type (Owner or User) of
each one.

With a valid Owner Code, the 6 command can also used to change user passcodes and types.
See the Owner or User Manual for your specific system for details.
Press 7 - Select Watch Tone
The Radionics home security "Watch Tone" function allows the
system to sound a tone when a door or window is opened while the system
is disarmed. Many use this feature as a “door chime” for their home or
business.
To set the watch tone, press the 7 key. The keypad will
display the current watch tone selected. To change the tone, enter your
owner code.
The system will scroll through the watch tone options. Choose the setting you want by pressing the indicated digit:
- Off: The faulted point will show on the display, but no tone will sound.
- Short Beep: Probably the most commonly used option, this displays the point name and sounds a brief tone when a point is faulted.
- Beep til Key: Displays point name, and sounds a repeating tone until the Clear key is pressed. Probably the most annoying option possible.
- Beep til Closed: Displays the point text, and sounds a repeating tone until the door or window is closed. On second thought, THIS may be the most annoying option possible!
After choosing the tone you want, the system confirms your selection, then returns to the idle display.

Press 8 - Select Watch Points
Here you choose which points you want to “watch” when
the watch tone function is turned on. This will usually include entry
doors, allowing you to know when one one goes in or out. It typically
will NOT include interior protection such as motion detectors, since
they would trigger beeping almost constantly as you move around the
area.
To select your watch points, press 8 and enter your
passcode. The display will show which points are are currently being
watched (Watch On), and which ones aren’t (Watch Off). This is followed
by prompts to change the current settings.
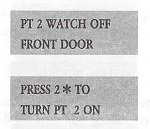
Example:

Follow
the instructions by pressing the desired point number, followed by the *
key, to change watch points as you would like them. After each change,
the display will confirm the new watch point setting.

When finished, press the Clear key to return to the idle display.
Arming Your Radionics Home Security System
First, check to see that the keypad is showing “System OK”,
indicating all points are ready to arm. If the display shows “Not Ready
to Turn On”, press and hold the * key to view the faulted points. Secure
these points until the display does show the System OK message.
Press 9 - Turn System All On
Pressing the 9 key once will arm the system All On (perimeter
and interior protection activated.) Exit and entry delays will be in
effect.
Pressing the 9 key twice will arm the system All On, but without entry or exit delays.
Press 0 - Turn System Part On
Pressing the 0 key once will start exit delay. At the end of the
exit delay, the system will be armed PartOn, with entry delay in effect.
Pressing
the 0 key twice will arm the system Part On, but without entry or exit
delays. Use this setting when staying home, and no one else is
returning.
To turn the system off, enter your personal passcode.
Press Clear - Exit any function / Silence trouble tone
Your
Radionics home security system may have other functions available,
depending on the particular model. For details on the operation of your
system, always check the model-specific User Manual.
Related Articles:
Radionics Security System Keypad Commands for Older Systems
Radionics Alarm Manual Sources
Radionics Security Systems - How to Stop Beeping Keypads
Return to Radionics Alarm Systems from Radionics Home Security
Return to Home Security Systems Answers from Radionics Home Security
Note: Feel free to print any of the articles on this site for personal, non-commercial use. Just look for this button:
If you found this website especially helpful, you might want to consider making a small donation. Since 2011, AzAlarmGuy has been providing free help and advice on home security systems to all of those in need.
Your gift, in any amount, will help me keep this website a free resource for anyone needing help with alarm system issues or questions.
Disclosure
I receive affiliate commissions from some of the companies and products I discuss. These commissions don't change the price that you pay.
Rest assured that this compensation does not influence my recommendations. I only endorse products and services that I truly believe to be an honest value for you, as a visitor to my site.
For more details, see my full disclaimer.


