- Home
- Compare Systems
- Cheap Systems
- Free Quotes
- DIY Systems
- Hardwired Systems
- Wireless Systems
- Smoke Detectors
- Medical Alarms
- Alarm Monitoring
- Cameras & Video
- Ademco
- ADT Security
- Brinks Security
- Broadview
- DSC Security
- FBI Alarms
- GE Security
- Honeywell
- Link Interactive
- Monitronics
- Moose
- Napco
- Protection 1
- Radionics
- Simplisafe
- Alarm Manuals
- Alarm System Parts
- Alarm Tools
- Troubleshooting
- FAQ
- Glossary
- Sitemap
- About Me
- Contact Me
The Best
Overhead Door Contact
Mounting Locations
An overhead door contact is a switch used to tie a garage overhead door into a home alarm system. They operate exactly like a standard magnetic contact, but are built inside a rugged housing to take the vibration and temperature extremes of a garage environment. Manufacturers include Honeywell, Sentrol, and Seco-larm.
Most homeowners don’t include an overhead contact in
their main house alarm system plans, mainly for reasons of convenience.
For help in deciding whether or not you need (or want) to alarm the
overhead door, see this page on connecting a garage door contact.
Like most home security devices, proper installation of an overhead
contact is critical to success. Here I’ll show you the best ways to
install overhead switches and magnets to avoid damage or other problems.
Warning:
Before installing any type of garage door alarm devices, always unplug
the opener motor and/or disconnect the door from the track. Someone
could accidentally activate the door with a remote control, causing you
serious injury!
Before permanently installing an overhead door contact, check for
clearance. Disconnect the door from the opener, and move the door
completely through its full range of travel manually.
Go slowly, and be sure the contact and magnet won’t hit anything when installed in their final locations.
Overhead Door Types
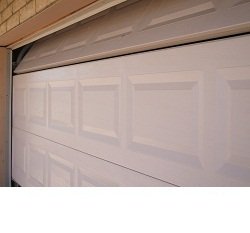
The two styles of garage overhead door found in residential construction are the sectional or roll-up type, and the older style one-piece or swing-up awning type. For new construction and replacements, sectional panel overhead doors are the standard.
For one-piece overhead doors, a contact can be installed at either the top (preferable) or the bottom.

For sectional overhead doors, there are 3 choices: top, bottom,
or track mounting. Standard overhead door contacts are used for top and
bottom locations, while installing on the track requires a special
track-mount contact. Let’s look at each mounting location, and see which
one is best for your situation.
Bottom Mount Location
Bottom mounting has been the most common method used for overhead doors
in the past, and can still be a good option. The contact is secured to
the concrete floor using plastic anchors and screws. The magnet attaches
to the bottom rail of the overhead door with screws, or with bolts and
nuts.
The two biggest drawbacks to the bottom-mount method are:
- Drilling into the concrete garage floor
- Possible damage to the contact from garage traffic
Drilling into concrete for the anchors can be as easy as using a masonry bit of the proper diameter. And, for a newer house, that’s probably all that would be necessary.
For older homes, it may not be so simple. Concrete hardens as it
ages, so drilling into a garage floor that’s several years old will
likely require a hammer drill. Hammer drills not only spin the bit like a
regular drill, but they pound the bit forward in rapid pulses to chip
into the concrete. This tool is relatively expensive, and not something
the average homeowner would own. Also, special bits are needed that are
strong enough to handle the pounding of impact-type tools.
The other, much less likely problem with bottom mounting of an
overhead door contact is possible damage from traffic into and out of
the garage. Your car will probably never hit the overhead contact, unless you’re a very poor driver! No, damage is more likely to come from bicycles, ATV’s, riding mowers and even materials stacked near the door.
The overhead door contact itself is built pretty tough, and is usually
not damaged. More commonly, the armored cabling containing the wiring
can get snagged and pulled apart.
For these reasons, I recommend avoiding the bottom location. Top
mounting is a better option for one-piece doors, and track mounting is
best of all if you have a sectional overhead door.
If you must install an overhead door contact at the bottom, careful
installation can make damage to the contact fairly unlikely. Follow
these tips:
- Install the magnet and contact as close to the side of the overhead door
opening as possible. This is usually determined by where you can neatly
position the magnet on the door panel.
- Use clips and screws to secure the armored cabling to the floor every 2 inches or so.
Both of these steps will help to reduce the chance that the armored cable gets snagged and damaged.
Overhead Door Contact - Top Mount
Top mounting a garage door contact is a good way to keep it and the magnet out of harm’s way from traffic.
For top mounting, the contact is installed on the header board using
screws. The magnet attaches to the top edge of the door with screws or
bolts and nuts. As with any overhead contact, secure the cable every few
inches to keep it from becoming caught during door movement.
Track Mount Location
A garage overhead contact that changed the game for me was the
Sentrol garage door sensor. Until this unit came out several years ago,
overhead door contacts could only be mounted either at the top or
bottom.
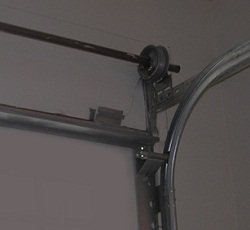
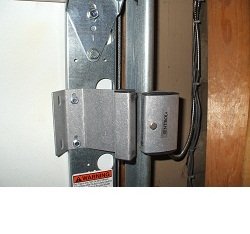
The track mount switch is specially designed to fit the curved profile
of the guide rail of a sectional door. It clamps on to the track with
tension from a setscrew, so no drilling is needed for the switch.
The magnet installs into the corresponding spot on the door panel with self-tapping screws, so a socket bit will do the trick.
Overhead Door Contact Recommendations
Whenever possible, choose a track mount contact for any
sectional roll-up overhead door. They don’t cost much more than a
standard overhead door contact, and the savings in time and labor is
well worth the added expense.
For a DIY home security system/do-it-yourselfer, the few dollars
spent beats having to buy a hammer drill. For professional alarm
installers, the lack of “headache factor” is well worth any minor cost
in materials.
For a one-piece overhead door or if you can’t use a track-mount contact
for some reason, top mounting is the best option. This keeps the contact
and magnet off the floor area where damage is most likely to occur.
For more details on actual switch and magnet installation methods, see Garage Door Alarm Contacts - Tips & Techniques.
If you haven't done so already, get a few Free Home Security Systems Quotes from companies in your area.
This will give you a good idea of what it would cost to have a system installed, as well as how much you could save by doing it yourself.
Related Articles:
Why Connect a Garage Door Contact to a Home Alarm System?
Hardwired Home Security System
General information on Hardwire Contacts
For protecting regular doors, get help with a Magnetic Door Switch
Learn about window protection using a Magnetic Reed Switch
To monitor your driveway, check out this Driveway Alert System
Return to Home Security System Answers from Overhead Door Contact
Return to Hardwired Home Security Systems from Overhead Door Contact
Note: Feel free to print any of the articles on this site for personal, non-commercial use. Just look for this button:
If you found this website especially helpful, you might want to consider making a small donation. Since 2011, AzAlarmGuy has been providing free help and advice on home security systems to all of those in need.
Your gift, in any amount, will help me keep this website a free resource for anyone needing help with alarm system issues or questions.
Disclosure
I receive affiliate commissions from some of the companies and products I discuss. These commissions don't change the price that you pay.
Rest assured that this compensation does not influence my recommendations. I only endorse products and services that I truly believe to be an honest value for you, as a visitor to my site.
For more details, see my full disclaimer.


