- Home
- Compare Systems
- Cheap Systems
- Free Quotes
- DIY Systems
- Hardwired Systems
- Wireless Systems
- Smoke Detectors
- Medical Alarms
- Alarm Monitoring
- Cameras & Video
- Ademco
- ADT Security
- Brinks Security
- Broadview
- DSC Security
- FBI Alarms
- GE Security
- Honeywell
- Link Interactive
- Monitronics
- Moose
- Napco
- Protection 1
- Radionics
- Simplisafe
- Alarm Manuals
- Alarm System Parts
- Alarm Tools
- Troubleshooting
- FAQ
- Glossary
- Sitemap
- About Me
- Contact Me
Replacing Electric Smoke Detectors
110-Volt Hardwired Smoke Alarms
This page is intended to help you replace hardwired 110-120-volt
electric smoke detectors. These residential smoke alarms are required
for fire protection by building codes in cities in the United States,
and are typically installed during the construction phase of a new
house.
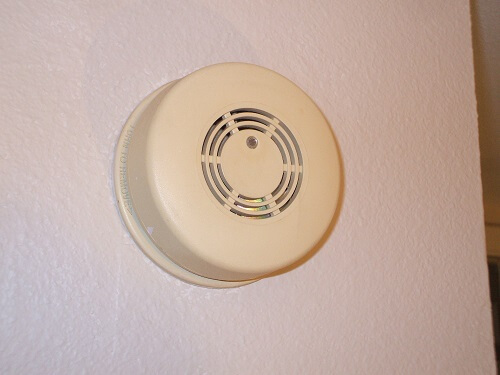 Existing 110-volt electric smoke alarm
Different types of smoke detectors can be easily
identified by removing the unit from the base plate or wall mounting
bracket. Look for these indicators:
- 2 or 3 fairly heavy-gauge wires, usually coming out of a metal or plastic junction box, and usually connected with wire nuts. These mean the unit is most likely a 110-volt electric smoke alarm, and this article will help you replace it.
- 1 or 2 small-diameter wires coming from a junction box or hole in the drywall. Wiring connects to screw terminals on the detector. This indicates a low-voltage smoke detector tied to a home alarm system. For more info on this type, see Home Smoke Detectors.
- No wires at all will be present for battery operated smoke detectors.
Replacing a 110-volt fire alarm isn’t difficult, and can be done in 30 minutes or less by following the instructions included with the new detector.
Changing out multiple electric smoke alarms could take a
few hours or more, depending on how many you have and how hard they are
to reach.
All types of smoke alarms should be replaced every 10 years, or when recommended by the maker.
If you’re not sure how old a detector in your house is, check the back for a date stamp.
Smoke detector manufacturers typically stamp the date of manufacture somewhere on the back of the unit.
If the date is 10 years old or older, or if you can’t find a date stamp, the unit should be replaced.
I’m replacing an old smoke detector in my own house for this project.
When the home was built, just one wired-in electric smoke alarm was
installed; I added the low-voltage combination smoke and heat detector
in the same location when I installed my monitored home security system.
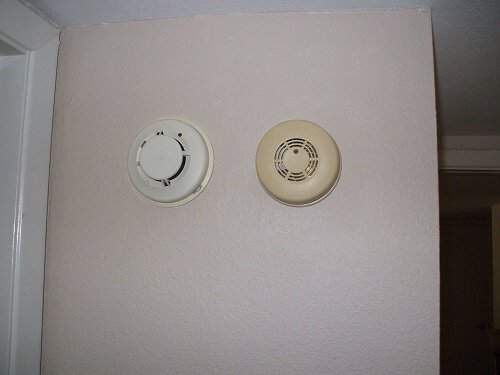 Electric smoke detector (right) beside low-voltage photoelectric smoke alarm (left)
If
you have a similar situation, be sure to call the alarm monitoring
station and put the system in “Test” mode while you’re working on the
change-out. I did this just to be safe because, even though I wouldn’t
be working on the monitored detector, any dust or vibration I might
cause near the unit could possibly set it off.
Since the existing
System Sensor low voltage unit is a photoelectric smoke alarm, I
decided to use an ionization type smoke alarm for the new unit.
The new smoke detector being installed here is a First Alert smoke alarm, Model SA9120BPCN. It is a 110volt ionization type with battery backup, and is a good general purpose hardwired detector for most homes.
If you have gas appliances, or for some other reason want CO (carbon monoxide) protection, you might consider the First Alert Model SC9120B combination smoke and carbon monoxide alarm.
With that out of the way...Let’s get started!
Steps for Replacing Hardwired 110-volt Electric Smoke Detectors
1) Turn off power at the circuit breaker panel
Most 110-volt hardwired smoke
detectors have a light that stays lit constantly. Have a helpful
assistant turn off breakers, one by one, and watch for the light to go
out.
If you aren't sure which circuit breaker controls your smoke detectors, turn off the "Main" breaker. This will likely cause clocks in some appliances like microwaves and ovens to lose their time settings, so do this when you have time to reset them.
Also, plan on doing this project during daylight hours, since throwing the main breaker will kill all inside lighting.
2) Remove the old unit from the base plate
Electric smoke detectors can consist of a main unit with a removable cover, or a main unit and a detachable base plate.
For
the first type, the cover simply twists off or can be popped off by
pulling on it.
Electric smoke detectors with a detachable base plate
will come off when twisted, usually to the left or counterclockwise.
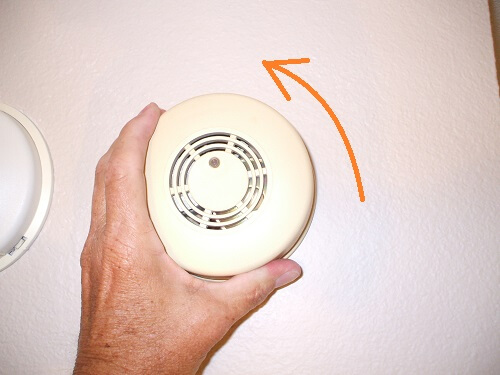 Remove old electric smoke alarm by rotating counterclockwise
If
you can’t get the unit apart easily, check the plastic housing for an
indication of how to remove the unit. Some electric smoke detectors have
a tab that must be pressed before the housing can be released or
turned.
Once the unit is apart, look for two mounting screws
holding the main unit or the baseplate to the wall or junction box. In
most cases, these only need to be loosened; the housings and base plates usually have slotted holes that allow them to be removed while the screws are
still attached to the junction box.
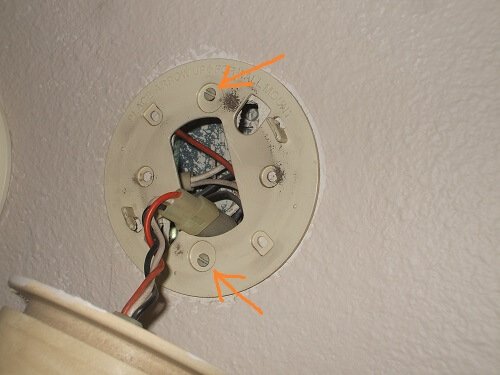 Locate 2 mounting screws, and loosen to remove base plate
3) Compare the wiring connected to your old electric smoke detector
to the smoke alarm wiring diagram supplied with the new one
Pull the house wiring out of
the electrical junction box until there is enough slack to work with. There
should be 2 or 3 wires of the old smoke detector that correspond to the
wires on the new unit.
 Compare your wires to the smoke detector wiring diagram
Electric smoke detectors usually have a
black “hot” wire, a white “neutral” wire, and a third colored wire
(usually red, orange, or yellow) for other interconnected smoke alarms. If your
house has only one electric smoke detector, the third wire is not used.
If there is a bare copper “Ground” wire, it is not needed and it can be tucked out of the way.
If you have trouble keeping track of which wires go where, you can use
masking tape to label the house wires that are connected to each colored
wire on the old smoke alarm.
Or, take a photo of the connections with your smartphone or other camera.
4) Disconnect the house wires from the old smoke
There will probably be a plug-in connector tied to the house wiring. If this connector matches one of the adapters included with the new detector, connect it now.
If none of the adapters fits the existing connector, remove it by taking off the wire nuts; just twist them counter-clockwise to remove.
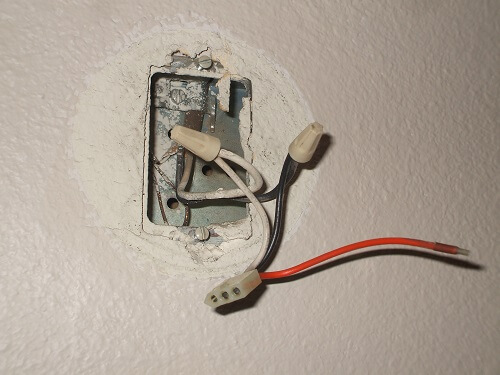 Disconnect the smoke alarm wiring by removing the wire nuts
5) Install new base plate and connect smoke detector wiring
Thread
the house wiring through the center opening of the new base plate, then
mount it to the junction box. Fasten the base plate using the existing
screws or the new hardware supplied.
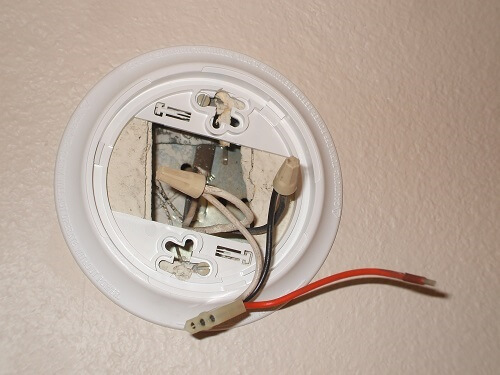 Install the new smoke detector base plate
Connect the “Hot”,
“Neutral”, and, if used, "Interconnect" house wires to the matching wires on the new detector pigtail harness. Refer
to the supplied smoke detector wiring diagram and, if needed, your
labels and/or photo to match up the correct wires.
The First Alert smoke detector shown here came with 2 adapters that will fit many older Kidde, Fyrnetics, Lifesaver, and Firex detector harnesses. As mentioned above, if your new smoke has an adapter that happens to fit your existing harness, just snap the connectors together and skip dealing with the wire nuts.
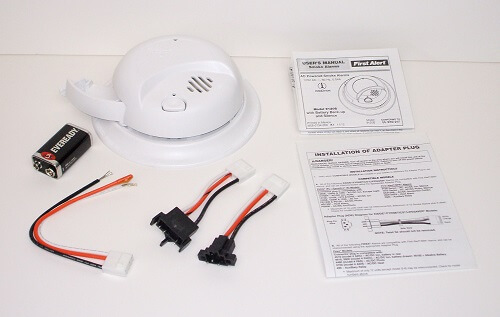 First Alert smoke alarm with pigtail harness and adapters
If you need to use wire
nuts, hold the wires to be joined so that their ends are even. Then,
screw on the wire nut by twisting to the right or clockwise.
When wiring
smoke alarm connections with stranded wire, twist the strands clockwise into a
tight bundle to make installing the wire nut easier.
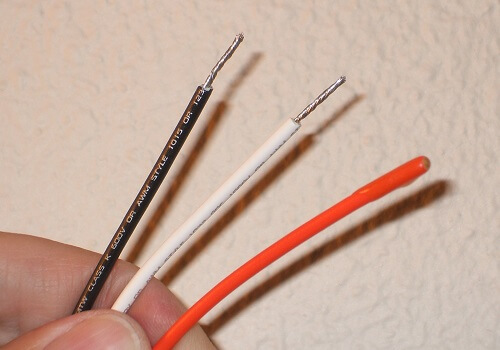 Twist stranded wire tightly to make connecting easier
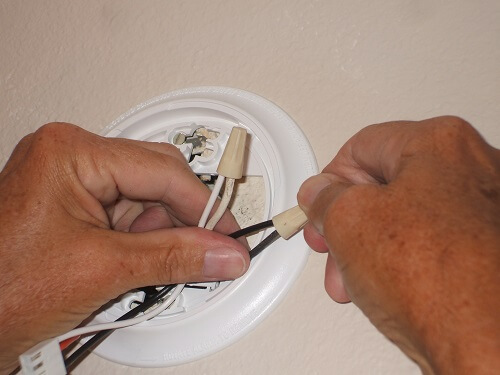 Connect house wiring to the new smoke detector wiring harness using wire nuts
If you’re not using the third interconnect wire, make sure it is factory insulated. If it's not, wrap the
end with electrical tape or screw on a wire nut to insulate it.
If you are using the third wire, be aware that these are usually factory insulated. Use wire strippers to expose the bare copper wire on the new harness, then use a wire nut to connect it to the house third wire.
Note: You may have noticed that the wires shown here appear silver, while bare copper is usually yellowish in color. This is because the wire was "tinned" during manufacture.
Tinning is simply a
coating of solder applied to the wire. Its purpose here is to make connections easier and more secure.
6) If the new unit only allows access to the backup battery from the back, install it now
7) Push the smoke detector wiring back into the junction box, and install the smoke alarm onto the base plate
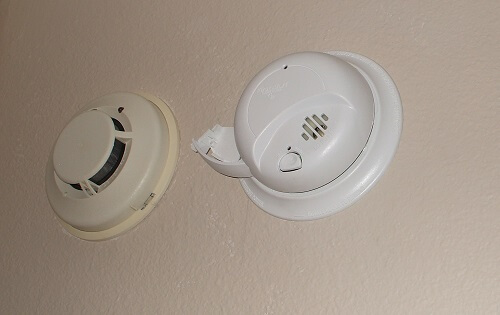 Plug in the connector harness, then install the smoke detector onto base plate, turning clockwise to fasten it
8) Install the backup smoke detector battery, if you didn’t do so in Step 7
This detector has a convenient swing-out door on the battery compartment, making battery replacement easy. This might be a feature you want to look for when shopping for replacement smoke detectors.
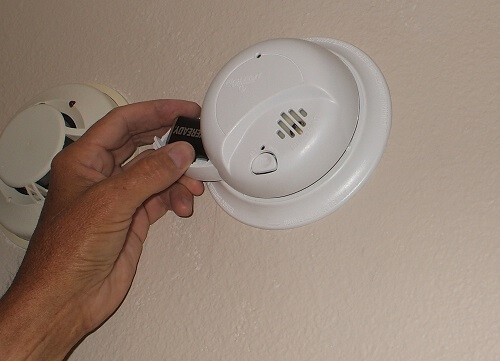 Install the backup battery
9) If you are replacing multiple hardwired smoke alarms, proceed to
the next detector and repeat the removal and installation steps
10) When all smoke detector installation is complete, turn power back on at the electrical breaker box
11) Test the new smoke detector(s) according to the smoke alarm
manufacturer’s instructions
For most units, you’ll need to press and
hold a smoke detector “Test” button until the detector (and other
interconnected smoke detectors) sound an alarm.
When testing a series of interconnected units, be sure to test every unit individually.
If any unit doesn’t test
properly, turn off the power and check that the connections are all
wired correctly and are secure.
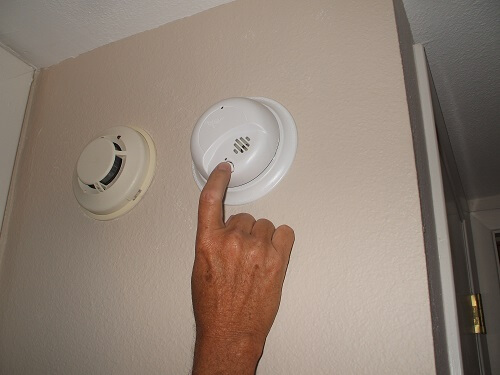 Press and hold the smoke detector "Test" button until the unit sounds
Maintenance
- Replace the smoke alarm battery every year, or when chirping indicates a battery problem.
- Replace the smoke detector every ten years.
- If you have several electric smoke detectors to replace, you can save
money by shopping for multi-packs. Many detectors are available in packs
of 2, 3, and 6.
Thinking about getting a home security system or replacing an old one?
Get a few free quotes to see how much a new system would cost!
See First Alert SA9120BCN Hardwire Smoke Alarm at Amazon.com
See First Alert SC9120B Hardwire Combination Smoke/Carbon Monoxide Alarm at Amazon.com
Related Articles:
Help with smoke detector problems
Help with a beeping smoke alarm
Kidde Smoke Alarms
System Sensor Smoke Detectors
First Alert Smoke Detectors
Firex Smoke Detectors
More info on hardwired smoke detectors
Return to Home Smoke Detectors from Replacing Electric Smoke Detectors
Return to Home Security Systems Answers from Replacing Electric Smoke Detectors
Note: Feel free to print any of the articles on this site for personal, non-commercial use. Just look for this button:
If you found this website especially helpful, you might want to consider making a small donation. Since 2011, AzAlarmGuy has been providing free help and advice on home security systems to all of those in need.
Your gift, in any amount, will help me keep this website a free resource for anyone needing help with alarm system issues or questions.
Disclosure
I receive affiliate commissions from some of the companies and products I discuss. These commissions don't change the price that you pay.
Rest assured that this compensation does not influence my recommendations. I only endorse products and services that I truly believe to be an honest value for you, as a visitor to my site.
For more details, see my full disclaimer.


