- Home
- Compare Systems
- Cheap Systems
- Free Quotes
- DIY Systems
- Hardwired Systems
- Wireless Systems
- Smoke Detectors
- Medical Alarms
- Alarm Monitoring
- Cameras & Video
- Ademco
- ADT Security
- Brinks Security
- Broadview
- DSC Security
- FBI Alarms
- GE Security
- Honeywell
- Link Interactive
- Monitronics
- Moose
- Napco
- Protection 1
- Radionics
- Simplisafe
- Alarm Manuals
- Alarm System Parts
- Alarm Tools
- Troubleshooting
- FAQ
- Glossary
- Sitemap
- About Me
- Contact Me
Alarm Programming
Quick Keypad Connector
The Alarm Programming Quick Keypad Connector shown here allows an alarm technician or do-it-yourselfer to easily attach a programming-capable keypad to the four databus terminals of an alarm control panel. This is the easiest, fastest way to make on-site programming changes when the originally installed “basic” keypads don’t support it.
When using the connector, no screwdriver or other tools are needed. If you have a keypad capable of programming and access to the security panel, programming can begin almost instantly.
Why Make an Alarm Programming Quick Connector?
Like many other products, alarm equipment can often be had in “basic”
and “deluxe” versions. In the security industry, this is often seen in
the different alarm keypads used to arm, disarm, and operate the system.
There are basic, “fixed display” keypads, as well as enhanced
“alphanumeric”, or “alpha” keypads.
The difference is not just cosmetic. For many brands of alarm, notably Ademco home security systems, an Alpha 6160 keypad is required to make installer-level alarm programming changes. While the Ademco 6150 keypad with a fixed-display is fine to operate the system on a day-to-day basis, it cannot display all of the information necessary for the complete programming of the system.
Many
home alarm companies will install a system with only
basic keypads. The basic keypads are cheaper, and allow the dealer to
offer the system at a lower cost.
The necessary installer programming is done during installation,
either with an alpha keypad, which is then removed from the home site,
or by remote access.
Any future programming changes can then only
be made using the remote access software, or at the site by temporarily connecting an alpha keypad.
The Problem with Temporary Keypad Connections
Wiring an additional keypad to an alarm panel, even temporarily, isn’t always as simple as it sounds. Here’s why:
Most
security system panels use 4-wire terminals, known as a databus, to
make connections to keypads, zone expanders, output modules, and any
other “smart” devices requiring data.
These terminals provide:
Plus (+) power
Minus (-) power
Data In or “A”
Data Out or “B”.
One problem: Most alarm panels only provide a single screw terminal for each of the four necessary connections.
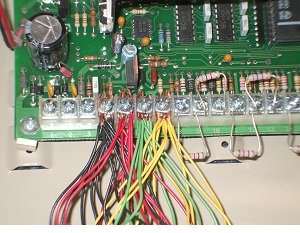
This
means that alarm systems on mid-size or larger homes often have a mass
of wires stuffed under the terminal screws of the data bus.
In
order to attach a programming keypad, the screw terminals must be
loosened, and yet another set of wires jammed into the mix. After alarm
programming is completed, these temporary wires must be removed. This
usually causes a few of the existing wires to pop loose. These can
easily lead to short circuiting of terminals, lost or loose connections,
and device malfunctions, any of which will require a call-back visit.
In addition, making the wiring connections requires using both
hands, and a close-up look at the screw terminals. Since many security
system main panels are mounted high on the walls of closets, this means
that a ladder must be used to do the job. In my case, a flashlight and
glasses are also needed...
I hate to complain (well, OK, maybe a
little!), but all of this fussing around seemed like a waste of time to
me. All I needed was a keypad connection for a minute or two to
reprogram a few items!
My Solution to the Problem
After dealing
with this situation many times, I came up with the idea for the “Alarm
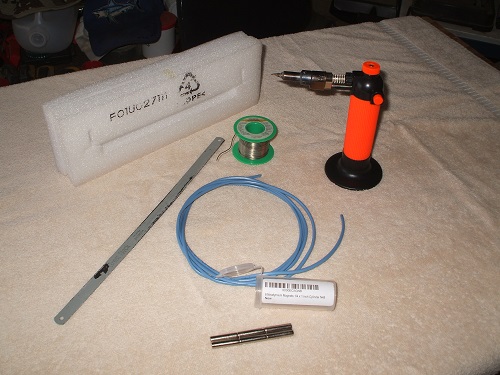
Programming Quick Keypad Connector”. It consists of a 6-8-foot length of
4-conductor wire, some rare-earth magnets, and a small block of sturdy
foam or rubber. The foam typically used to pack electronic devices works
very well for this.
Panel-side Wiring
At the alarm panel-end of the wire, the red, black, green, and
yellow (or white) wires are each soldered to a rare-earth magnet. The
magnets used here are ¼” diameter, 1” long, and will be press-fit into
holes in a block of foam. The holes in the block are spaced to match the
spacing of the terminal screws (#4, 5, 6, & 7) of the alarm panel
to be programmed, in this case an Ademco Vista 10SE.
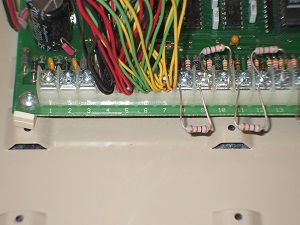
As we’ll see, I should have used 1/8” magnets instead of ¼”. More on that later…
Pre-punch the holes in the foam using a small screwdriver or piece
of stiff wire, to give a very snug fit for the magnets. It should be tight
enough to hold them in position, but loose enough to let them attach
magnetically to the terminal screws.
Rather than just soldering the wires to the magnets randomly, follow these steps for a better result:
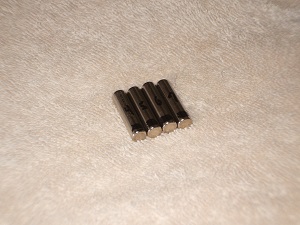
First, clean each magnet with an alcohol wipe to remove any grease or dirt.
Second, stick the four magnets together and lay them out flat, letting them
orient themselves magnetically. This will result in the magnets’ “North”
and “South” poles alternating polarity with each other, which will
allow them to stay aligned better in the foam block.
Now, the
alarm panel screws don’t really care which magnetic poles are actually north or south, and for that matter, neither do I:) All
that matters is that they alternate polarity from side
to side.
Third, mark all four ends on the same side with a Sharpie
or other marker. Mark the terminal number as well. This will let you
know which end is which when the magnets are separated for soldering.
Begin
soldering by “tinning” each wire and magnet with a good rosin core
solder. If you’re new to soldering, tinning simply means heating a wire
or connection up with the soldering iron until it’s hot enough to melt
the solder. Then, solder will easily flow onto the surface of the wire
or other metal.
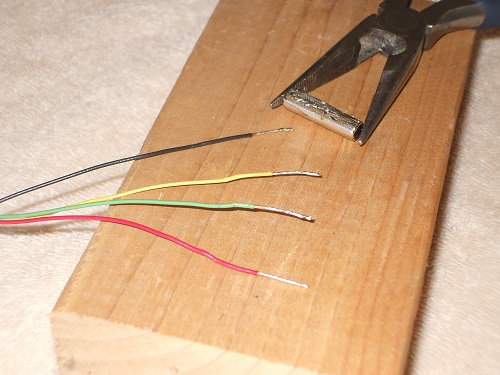
After
the wires and magnets are tinned, hold a wire to the tinned area of its
magnet, and apply heat along with a bit more solder. The two should
join smoothly as the solder melts and flows. Remove the soldering iron,
being careful to hold the wire and magnet in place for a few seconds
until the joint cools.
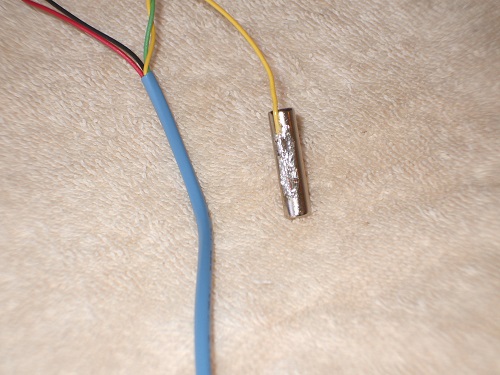
If
you happen to move the joint as it cools, it will probably result in a
“cold joint”, which will break loose easily. If this happens, no
worries; just re-heat both parts, add a touch more solder, and try
again.
After all of the magnets have wires attached, they can be installed into the foam or rubber block.
Tech Tip:
The ¼” diameter magnets I used were too large to fit in the foam block
without splitting it apart. I had to switch to using a rubber eraser for
the block, pre-drilling holes with a drill press.
If you decide to do this project, use 1/8” rare-earth magnets instead.
They will fit much better in the foam, and are plenty strong enough.
As a side benefit, 1/8” magnets will be much easier to heat up for soldering!
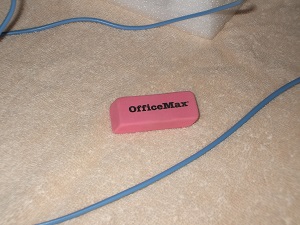
Be
sure to insert the magnets into the block in the correct order. Match
the color code of the wires to correspond with the plus (positive),
minus (negative), and data in/out terminals of the panel. I used colored
markers on the block to make it easy to see which terminals are which.
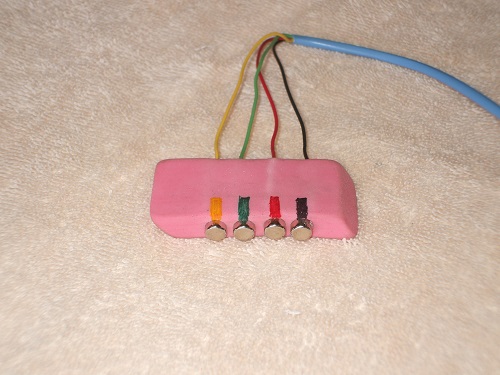
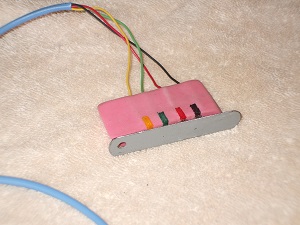
To
preserve the strength of the rare-earth magnets, as well as maintain
the shape of the block, you can make a “keeper”. This is just a short
length of ferrous metal that the magnets stick to when not in use. A
piece of worn-out hacksaw blade with the edges ground smooth works
nicely for this, thank you.
Keypad-Side Wiring
The Ademco 6160 keypad I used has screw terminals on it, so the
keypad end of the 4-wire connects to these. If the security alarm keypad
you’re using also has its own screw terminals, just connect it
following the color code as usual.
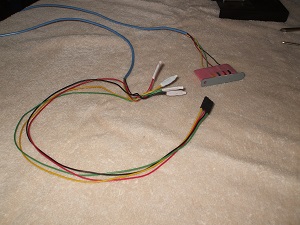
Some other brands of alarm
system keypad use a plug-in 4-pin keypad connector. If you have one like
this, just attach the keypad-end of the 4-wire to the keypad connector
leads using regular “B” crimp connectors or wire nuts.
Using the Alarm Programming Quick Keypad Connector
To use the quick alarm programming connector, make sure the keypad is securely attached to the 4-conductor wire.
Next,
position the magnets in the foam/rubber block directly in line with the
alarm panel databus terminals. Match the color-coding on the block to
the wiring already attached to the terminals.
Note that this doesn’t require two hands to perform, just one to reach the
terminal strip. Also, you likely won’t need glasses and a flashlight to
make the connection. Just identify the wire colors under the databus
screws, move the block close to the terminals, and let the magnets pull
the block until they make contact with the screw heads.
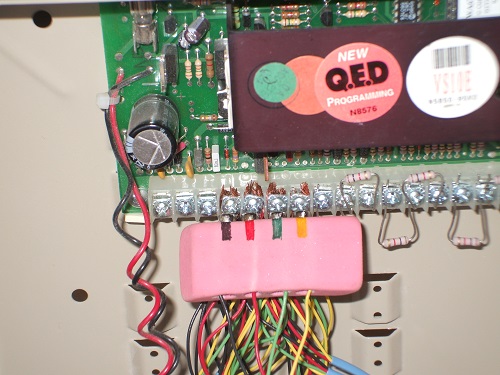
The
keypad should light up at this point. If it doesn’t, check that all
four of the magnets are firmly touching their respective screw
terminals. If not, slide the magnets in or out of the block until all of
them can make contact with a screw head.
Once the keypad has a
good connection on all four terminals, alarm programming can begin. The
6-8-foot length of the 4-conductor wire should be enough to allow
comfortable handling of the keypad without the magnet block pulling
loose from the terminals.
After you complete the needed security
system programming and are satisfied that all is well, just pull the
magnet block away from the alarm panel to remove it. Attach the magnetic
keeper, and you’re done!
Going Further
This little keypad wiring adapter has saved me a ton of time and
aggravation when doing alarm programming changes on Ademco home security
systems, in particular.
By adjusting the magnet spacing, you
can adapt this idea to suit any make or model of security panel you
either own or work with often. Please do make sure to match the pin-out of the keypad wires to that of the panel you’re connecting to.
As
mentioned earlier, you should learn from my mistake and use 1/8”
magnets to build this adapter. Not only are they are easier to fit into a
foam block, but there is another benefit:
Some brands of panel,
such as DSC security systems, have small screw terminals spaced closely
together. Using 1/8” diameter magnets will allow you to match the
narrower screw spacing on the DSC alarm system. You will likely need to
use rubber, rather than foam, due to the tighter spacing.
I hope you find this quick alarm programming connector as useful as I have!
See this page for more information on Alarm System Keypads.
If you haven't done so already, get a few Free Home Security Systems Quotes from companies in your area.
This will give you a good idea of what it would cost to have a system installed, as well as how much you could save by doing it yourself.
Related Articles:
Ademco Home Alarm System Code Programming
Ademco Vista 20P Wiring Diagram
Ademco Manuals
Return to DIY Home Security Systems from Alarm Programming Quick KeypadConnector Connector
Return to Home Security Systems Answers from Alarm Programming Quick Keypad Connector
Note: Feel free to print any of the articles on this site for personal, non-commercial use. Just look for this button:
If you found this website especially helpful, you might want to consider making a small donation. Since 2011, AzAlarmGuy has been providing free help and advice on home security systems to all of those in need.
Your gift, in any amount, will help me keep this website a free resource for anyone needing help with alarm system issues or questions.
Disclosure
I receive affiliate commissions from some of the companies and products I discuss. These commissions don't change the price that you pay.
Rest assured that this compensation does not influence my recommendations. I only endorse products and services that I truly believe to be an honest value for you, as a visitor to my site.
For more details, see my full disclaimer.


