- Home
- Compare Systems
- Cheap Systems
- Free Quotes
- DIY Systems
- Hardwired Systems
- Wireless Systems
- Smoke Detectors
- Medical Alarms
- Alarm Monitoring
- Cameras & Video
- Ademco
- ADT Security
- Brinks Security
- Broadview
- DSC Security
- FBI Alarms
- GE Security
- Honeywell
- Link Interactive
- Monitronics
- Moose
- Napco
- Protection 1
- Radionics
- Simplisafe
- Alarm Manuals
- Alarm System Parts
- Alarm Tools
- Troubleshooting
- FAQ
- Glossary
- Sitemap
- About Me
- Contact Me
Connecting
4 Wire Smoke Detectors
Adding Fire Protection to
Home Alarm Systems
Adding either 2- or 4 wire smoke detectors to a standard home security system is a good way to increase your safety and security.
If your system is monitored by a central station, you'll probably
also qualify for a larger discount on your homeowners insurance rate.
Whether you’re designing your own DIY home alarm system or
having one installed, adding smoke detectors is a smart way to get more
out of your investment.
Not all alarm panels are compatible with smoke detectors, but most newer ones are. Some alarm panels can use only 2-wire smoke detectors, while others can only use the 4-wire type. Still other panels are compatible with both.
This page shows how to connect single runs of 4-wire smoke detectors. For details on how to hook up 2-wire units, see
Connecting 2 Wire Smoke Detectors.
If you need to hook up more than one wire to a single fire alarm zone, see how it's done at Smoke Detector Wiring - Connecting Multiple Runs.
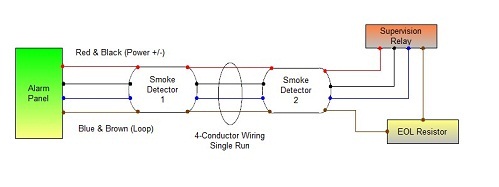
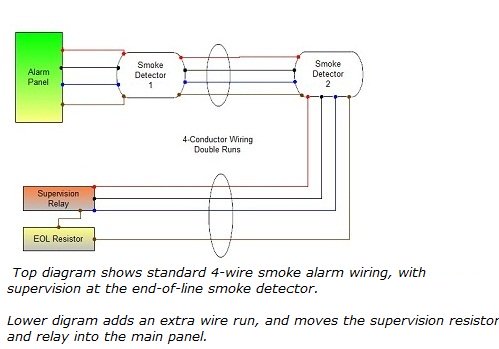
The schematics above show a typical 4-wire smoke detector
circuit. The top circuit shows a single run from the panel out to the two detectors, while the bottom shows a dual run out to the detectors, then back to the alarm panel.
In both cases, notice that Detector 1 is "looped" into the wire run,
while Detector 2 is the "end-of-line" device.
The wire colors mentioned here match the fire wire shown above. “Out” refers to “out” from the alarm panel:
- Red = Positive (+) loop out
- Black = Negative (-) loop out
- Blue = Positive (+) loop return
- Brown = Negative (-) loop return
The wire you have may use a different color scheme for the individual conductors than this.
The actual color of each wire doesn't matter, as long as you connect them the same way at each end.
Just assign each color to a function, and use that when making each connection.
End-of-Line Supervision
Notice that the blue & brown pair of wires has the same end-of-line resistor (EOLR) hookup as the 2-wire smoke. This resistor is “seen”, electrically, back at the main alarm panel, and verifies that the smoke detector wiring is unbroken.
Power Supervision Relay
Unlike the 2-wire smoke, a 4-wire smoke must also supervise the second pair of wires used for supplying power. This is provided by the power supervision relay.
As long as the relay’s coil gets power from the red & black pair
of wires, it holds the output contacts in the closed position. This
completes the blue/brown pair detection loop, and all’s well with the
main panel.
If the red or black wire is cut, pulled loose, or otherwise
damaged, the relay will no longer get power. Its normally closed
contacts will open, breaking the detection loop. This will cause the
alarm panel to generate a trouble condition with beeping keypads,
alerting the occupants of a problem.
If the security system is monitored, a signal will also be sent to the central station.
4 Wire Smoke Detector Placement
In most cases, home smoke detectors connected to a security system should be located adjacent to the 110-volt units required by local building codes. Residential codes vary, but in many areas of the U.S., two or three smoke detectors will cover a medium-sized home.
See Smoke Alarm Placement for Home Security Systems for guidelines on where to locate smoke detectors.
Always check fire codes in your area before adding any type of fire protection.
One way to do this is to call the number for the building department in your city.
Another way is to call a local security alarm company, and simply
ask about what’s required. A local alarm dealer will be familiar with
the fire codes where you live. And of course, most home alarm companies
will be happy to give free estimates for complete security systems.
Running 4 Wire Smoke Detectors
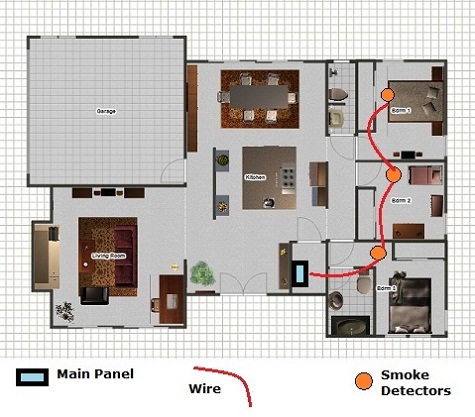
4 wire smoke detectors can be pulled in a single run looping to each
unit, just like 2 wire smokes. This is usually referred to as a “daisy
chain”, and works best for ranch-style homes.
Begin pulling from the main alarm panel location, past each smoke detector along the way, until the last smoke is reached. Then back-track, pulling enough slack on the wire to make connections at each wired smoke detector.
This is great, but sometimes not the best way of installing smoke detector wiring…
Case in point: If the last 4 wire smoke detector in the run is in
a hard-to-reach location (for example, above a stairwell), you may want
to wire the detectors differently.
Why?
Because smoke detector problems may happen in the future. The quickest way to find a problem is by checking continuity from the main panel, out to each 4 wire smoke alarm, and finally to the end-of-line resistor.
You would probably also like to meter for voltage going to the power supervision relay, in case it has failed.
If the resistor and relay are located at an inaccessible smoke detector,
you’ve got more work to do. Smoke detectors positioned above a
staircase are especially fun to deal with, and can’t usually be reached
safely using a regular stepladder.
But…
If you’ve cleverly checked smoke alarm placement ahead of time, and wired the system to put these items back at the alarm panel location, your job just got easier!
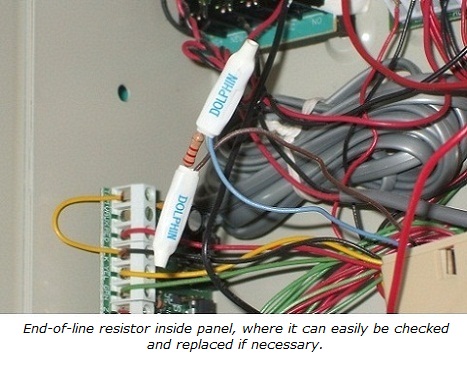
You can easily do this in a couple of ways:
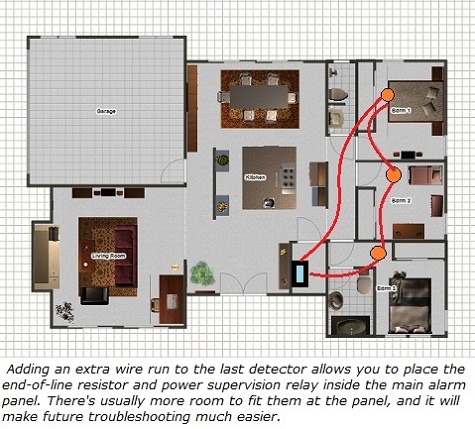
The first is by pulling two 4-conductor wires instead of just one. Then, connect the last 4 wire smoke detector in the run as if it were looped, using the extra wire run. This will give you a return path back to the panel, where you can then install the EOL resistor and power supervision relay.
The second way is similar; make a separate wire pull from the
panel directly to the last 4 wire smoke. This may be easier than the
first method, depending on the floor plan you’re dealing with. The
resistor and relay are then connected in the panel.
Both methods are electrically the same, and will put the end-of-line
resistor and relay inside the main panel. This makes them easy to test,
and to replace if necessary.
This simple step in planning a fire alarm device layout could save you a lot of time and energy down the road.
Making Connections to 4-Wire Smoke Detectors
In general, connect looped 4 wire smoke detectors to feed power and detection loops wiring “in” from the panel-side wire, and “out” to the next smoke in line.
Many 4 wire smoke detectors are designed so the wiring can connect to
the terminals from either direction. Follow the diagram and instructions
provided by the smoke detector manufacturer, just to be sure.
For specific details on how to connect wires to smoke detector screw terminals, have a look at Smoke Detector Circuit Basics.
For information on tracking down and repairing problems with fire wiring, see
Smoke Alarm Circuit Troubleshooting
for checking wiring at the main alarm panel.
And, for checking connections at the smoke detectors themselves, see
Troubleshooting Smoke Alarm Wiring.
Regular cleaning can help avoid smoke detector problems in the first place. See how to do it at System Sensor Smoke Detectors, Cleaning and Testing.
For details on hooking up a typical alarm panel, see Ademco Vista 20P Wiring Diagram.
Because the four-wire smoke design is fairly generic, it's often used in
functional versions of covert cameras. Find out more at Choosing a Smoke Detector Spy Camera.
If you haven't done so already, get a few Free Home Security Systems Quotes from companies in your area. This will give you a good idea of what a system would cost to have installed, as well as how much you could save by doing it yourself.
Return to Home-Security-Systems-Answers from Connecting 4 Wire Smoke Detectors
Return to Hardwired Home Security Systems from Connecting 4 Wire Smoke Detectors
Return to Home Smoke Detectors from Connecting 4-Wire Smoke Detectors
Note: Feel free to print any of the articles on this site for personal, non-commercial use. Just look for this button:
If you found this website especially helpful, you might want to consider making a small donation. Since 2011, AzAlarmGuy has been providing free help and advice on home security systems to all of those in need.
Your gift, in any amount, will help me keep this website a free resource for anyone needing help with alarm system issues or questions.
Disclosure
I receive affiliate commissions from some of the companies and products I discuss. These commissions don't change the price that you pay.
Rest assured that this compensation does not influence my recommendations. I only endorse products and services that I truly believe to be an honest value for you, as a visitor to my site.
For more details, see my full disclaimer.


